'Root'에 해당되는 글 472건

  1. 2008.03.27 [성능 테스트] Performance Engineering
  2. 2008.03.27 [PSP game] Downstream Panic Solutions. 다운스트림 패닉 답 링크
  3. 2008.03.26 [Weblogic] 웹로직(Weblogic) 서버 쓰레드(Thread) 및 DB connection Pool 관련 설정
  4. 2008.03.21 [Google Android-구글 안드로이드] 본격적으로 만들어 보기-4 Activity 클래스를 보다 간결하게 만들기
  5. 2008.03.21 [Google Android-구글 안드로이드] 본격적으로 만들어 보기-3 연습용 메인 프로젝트 만들기(안드로이드 메뉴 처리)
  6. 2008.03.21 [Google Android-구글 안드로이드] ddms 사용하기 (안드로이드 화면 캡쳐하기)
  7. 2008.03.21 [DevPartner] 프로파일링 시작 하기
  8. 2008.03.20 [Excel] 엑셀에서 각 항목별 개수 구하기 5
  9. 2008.03.20 [Microsoft Log Parser] Microsoft Log Parser (MS 로그 분석기) 사용하기
  10. 2008.03.17 [Access Log] Apache 서버 웹 로그 포맷 (access log format)수정하기
  11. 2008.03.15 [Blog2Book] 자바 성능을 결정짓는 코딩 습관과 튜닝 이야기 책에 있는 소스 코드 ver.1.1. 1
  12. 2008.03.12 [Javascript Link] Javascript를 사용하면서 필요한 모든 참조자료가 있는 사이트
  13. 2008.03.12 [Google Android-구글 안드로이드] 본격적으로 만들어 보기-2 연습용 메인 프로젝트 만들기(메시지 화면 처리) 1
  14. 2008.03.12 [블로그 관리 관련] Lightbox plus (Light TT EX)를 적용할 때...
  15. 2008.03.09 [Google Android-구글 안드로이드] 본격적으로 만들어 보기-1 연습용 메인 프로젝트 만들기
  16. 2008.03.07 [eclipse - 이클립스] Workspace in use or cannot be created, choose a different one. 이라는 메시지가 나타날때 5
  17. 2008.03.06 [Google Android-구글 안드로이드] UI 구현-2 일반적인 레이아웃 객체
  18. 2008.03.05 [Google Android-구글 안드로이드] UI 구현-1 화면 요소의 계층
  19. 2008.03.05 [Google Android-구글 안드로이드] 안드로이드의 라이프사이클
  20. 2008.03.04 [Google Android-구글 안드로이드] 안드로이드 개발 툴들
  21. 2008.03.02 [Google Android-구글 안드로이드] 안드로이드의 구성 (Activity, Intent Receiver, Service, Content Provider)
  22. 2008.03.01 [Google Android-구글 안드로이드] R.java 파일에 대해서...
  23. 2008.02.28 [Google Android-구글 안드로이드] 간단한 예외 처리 1
  24. 2008.02.28 [Google Android-구글 안드로이드] 직접 헬로월드 만들어 보기
  25. 2008.02.28 [DevPartner] DevPartner 화면 설명
  26. 2008.02.28 [DevPartner] 설치 방법
  27. 2008.02.27 [Google Android-구글 안드로이드] 헬로 월드 돌려보기
  28. 2008.02.27 [Google Android-구글 안드로이드] 시작하기.
  29. 2008.02.27 [Google Android-구글 안드로이드]란?
  30. 2008.02.27 [Fedora] Fedora update 하기 1

출처
http://www.theserverside.com/tt/articles/article.tss?l=PerformanceEngineering

Performance Engineering - a Practitioner's Approach to Performance Testing

나중에 심심할때 함 읽어봐야 겠다.


Context/Introduction

"The application is horribly slow.", "I don't get the response even after I get my coffee.", "This application is useless". Sounds familiar? How many times have we heard these quotes or or felt like that ourselves? The common thread between these statements is that the performance of the application is not good.

Performance - the (in)famous buzzword. What is it? What does it mean? In this article, we'll touch upon what is involved in testing an application for performance.

With every passing day, organizations are becoming more and more conscious about the performance of their Enterprise Solutions. As the IT industry matures and the technology evolves, so does the awareness about expectations from an Enterprise Application.

Focusing just on the design / implementation and Zero-functional-defect solutions are things of the past. With increasing maturity in technology and IT staff, the 'Non-functional' aspects of the system are fast becoming focus-areas.

So what exactly are the non-functional aspects and/or requirements?

Non-functional requirements (NFRs) tell the IT team, about the kinds of usage and load the application will be subjected to, and the expected response time. We'll go into the details of this "response time" shortly.

NFRs define the Service Level Agreements (SLAs) for the system and hence the overall Performance of the Enterprise Application. Besides performance SLAs, NFRs also cover several other aspects, such as security, but for this article we are concerned with performance related objectives only.

Managing and ensuring the NFRs (SLAs) for an Enterprise Application is called Performance Engineering. Performance engineering is a vast discipline in itself which includes Performance Modeling, Performance Prototyping, Performance Testing, different types of analyses, Performance Tuning, etc. This article will not explain Performance Engineering, Queuing Theory and the science behind the various laws. This article just covers the basics about the Performance Engineering and key activities in Performance Testing.

How to describe Performance of a 'System'

The performance of any system can be expressed in many ways by different stakeholders of the system. For example, When a business analyst gives performance (or non-functional) requirements, it might be in some format as follows:

  1. "there will be at least 100 users on the system all the time",
  2. "System should respond back in 'acceptable time'".

These statements have to be translated to somewhat more technical terms as described below. Once we understand these terms, we'll reword these Performance requirements.

To define the performance of any System (Software/hardware/abstract) following technical parameters should always be used in conjunction -

  • Response Time: Response time specifies the time taken by the system to respond back with the expected output. For an enterprise application Response time is defined as the time taken to complete a single business transaction. It is usually expressed in seconds.
  • Throughput: Throughput refers to the rate which the system churns expected outputs when the designated input is fed in the system. In other words, for an Enterprise Application, throughput can be defined as the total number of business transactions completed by the application in unit time (per second or per hour).

Usually, per second or per hour is the standard, since per day (or per diem) is a very wide unit. Most business users utilize an Application during typical 8 hour business window. Normally there are some peaks & some troughs in the input, so the volumes per day should not be averaged to an hour. All the mathematical distributions (normal, Poisson, uniform) come handy over here.

  • Resource Utilization: For any system to consume an input and produce the designated output, certain resources would be required. The amount of resources consumed by the system during processing that request, defines the resource utilization. There can be different resources factored in, such as processor, disk (i/o controller), memory etc. Utilization of 80% is considered an acceptable limit. Normally utilization of 70% warrants ordering of additional hardware.

Now that we know basic technical terms for expressing performance facts about a system, we'll try to rephrase the above Performance Requirements.

  1. We should ask the question whether all the users would be carrying out a transaction simultaneously or they would be just logged on. The answer of this question would lead us to the throughput expectations. In case of pre-existing applications (or using applications having similar profile), we can also arrive at the transactions/sec or throughput requirements from logs files (e.g., HTTP logs of web-applications.)
  2. The vagueness of "acceptable" times needs to be removed by defining the response time requirements clearly, e.g. 2 seconds, 2 hours or 2 days.

Let's begin then...

Performance test planning

He who fails to plan, plans to fail

As in all aspects of life, planning is very important in Performance Testing. We present the simplistic approach to planning a Performance testing exercise in the sub-sections below.

How to represent the SLAs? - Workload model/distribution/pattern

The first step of any IT project is usually requirements gathering. Similarly, for any performance testing project, its very important to gather the SLAs / NFR of the system against which the tests will designed and executed.

Performance testing depends as much on how well the SLAs are gathered as much as on how well they are represented. A well represented non-functional requirement can help a long way in the rest of the planning and analysis activities.

The various throughput rates, load figures, list of transactions, types of transactions, response times and projected growth in coming years are captured in a document called the Workload. Workload captures the load pattern, load distribution, transaction distribution, peak windows etc.

The workload should be thoroughly reviewed by the various stakeholders of the system, like, architects, business users, analysts, designers and performance engineers.

What to test? - Identifying Transactions

Once the Workload model has been prepared and reviewed thoroughly, the next step is to Identify candidate transactions. If we select too few transactions, the system might contain a serious SLA mismatch and if we select all the transactions, we might be heading towards a never ending performance test cycle.

The famous 80-20 rule comes in handy here. In most applications, 20% of the transactions cover 80% of application's core functionality (to be confirmed with the help of application experts). Once the workload model has been created, this step is fairly easy and straight forward.

It's also important to classify the transactions as the Performance Testing would be carried out differently for each type. The transactions could be very broadly categorized as online - where user submits a request and gets a response, and batch - where user submits a list of jobs and does not wait for the completion. The transaction mix also has to be identified, viz. transaction A has 50% requests, transaction B has 30%, and transaction C has 20%. All of A, B, C can occur together. This helps in deciding the mixed tests.

Also at times, there might be certain transactions which do not qualify as candidate transactions according to the 80/20 rule, but might be critical to business. Such transactions should also be considered for performance tests and all such transactions can be clubbed in one run to get a benchmark reading for analysis.

Where to perform tests? - Environment Setup & Planning

For Performance Testing, it is ideal to get an environment with the same capacity as the production/live environment. Many developers are of the opinion that one deliverable/outcome of performance testing/engineering exercise is to provide hardware projection for production use, which is perfectly right. Capacity projection and Production hardware gauging is altogether a vast topic. So for simplicity sake, we restrain ourselves to Production like environment (considering an earlier release of the application is already live on some hardware).

Besides the deployment hardware, there are many other pieces of hardware that would be needed to facilitate load testing. These can be broadly classified as load generation nodes, stub nodes and monitoring.

Load generation nodes are the machines used to generate load for the applications. These nodes are used to host the load generating software, such as LoadRunner, WinRunner, etc. Some open source alternatives are also available. Some custom scripts will have to be written which can run on these nodes to generate load on the system. These tools also help in monitoring the resource utilizations.

However it is not mandatory to use only these tools. Depending on the complexity some custom stubs may be written to do the testing.

Monitoring nodes usually can be the same as load generating nodes, since most of the load-generating software packages are also equipped with monitoring capabilities. Monitoring is an inherent aspect of Performance Testing. All the resource utilizations need to be monitored throughout the duration of the test to

  • ensure all the utilizations are within limits
  • identify the bottlenecks
  • The rate at which transactions are completing
  • Number of failed transactions...etc...

Stub nodes are the ones which will be usually hosting a stub to simulate some part of the software or external system that can not be included in the performance test runs - such camera or scanner devices that are operated manually, which wouldn't be a valid option for a repeatable performance test.

Data Preparation

Any enterprise system is usually programmed to process data. Thus, data planning for the performance testing of the system is a vital step. This directly affects the success of the Performance Testing exercise.

Data required for load tests can be broadly categorized as -

Initial/Retention Data - The performance of database is very much dependent on the amount of data present in the tables. When the application is in production, there is certain amount of data present in respective tables. While carrying out performance testing, it is necessary to have at least equal amount of data in the Test environment. In fact, depending on the system upgrade plans, the data in the test environment could be a multiple of production data.

Having same amount of data is one thing, and using the same distribution of data as in production is another. The distributions of data straight away affect the index performance and in turn the application performance.

The amount of data and its distribution should be validated by business and/or IT dept. before proceeding with Performance Testing.

Test Data - Once the retention data is fine, we turn our attention to test data. The same concepts as amount and distribution apply to test data as well. This time, we have to take concurrency into consideration too.

Designing scenarios

Any testing activity is comprised of the test cases and test-suite encompassing those tests. For performance testing there are some standard tests which are usually conducted on the candidate transactions of the system, depending on the nature of those transactions. The following subsections give a brief insight in each of those test scenarios.

Isolated runs

"Isolated" means running one transaction at a time. By running a single transaction and observing its behavior, we can see if it is able to utilize the hardware well. We can also see if it is able to meet its throughput requirements by running alone at least. The readings taken can also help in capacity planning (part of advanced Performance Engineering).

Usually isolated runs are preceded by Baseline / Calibration runs, where in just a single run of each transaction is executed to get the benchmark response times for all candidate transactions.

Mixed runs

"Mixed" means running all/multiple transactions simultaneously. This helps in identifying if all the transaction throughputs are met when multiple transactions are occurring parallely, i.e., it also tells us the effect of transactions on each other.

There are two schools of thought in the order of execution of these tests.

  • First, run mixed test in the beginning. If everything is fine, then we are saved efforts for isolated tests.
  • Second, run isolated tests in the beginning followed by mixed test. This is more useful when you want to determine the scalability of the application and do any capacity planning.

Trickle feed

This is mainly applicable in case of batch type of loads - e.g. the load may come as 'n' messages per five minute block.

Backlog runs

This is a typical batch load. Sometimes it might happen that the application receiving messages (say Application A) is down for long time, but the feeding application (say Application B) is continuously putting messages. Now when the application A comes up, how it behaves, can be found out by this testing.

Endurance

It has been observed that whenever a system is running for multiple days or months without downtime, its memory utilization increases or throughput falls or some exceptions occur. To find out if the application behaves fine even if run for longer duration, this test is used.

Stress

Sometimes, as the load on the system increases, e.g. on Christmas Eve for retail or shipping applications, the system throws errors or behaves unexpectedly. The stress test targets exactly this behavior. Determining that the software handles the load gracefully without crashing is the aim of this test.

Preparing Reports

Presenting results in an understandable format is normally a neglected area. If you don't do that, you are reaping only 20-30% benefits of Performance Testing. Properly presented results will enable business stakeholders to make informed decisions. Also, when it is time to do Performance Testing for the next version of the same application and if you don't have properly documented results (and if the people who did the exercise are gone), then you need to start all over again.

Key graphs

Here are some key graphs that should be created while executing Performance Testing and should be presented in a Performance Test Report.

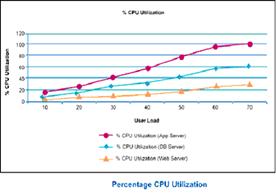
CPU Utilization vs. No. of users

This graph tells us whether the CPU utilization increases with increasing users. It also tells us about bottlenecks as well as what is the maximum number of users that can be supported.

Throughput vs. number of users

This graph tells us if throughput increases with increasing number of users. This graph should have a similar shape as CPU Utilization graph.

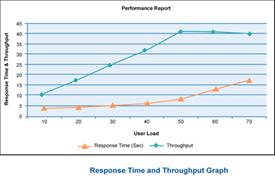
Response Time vs. throughput

The response time should be fairly constant with increasing throughput. If it is not, it is most likely a bottleneck.

Besides the above mentioned graphs, depending on the nature of transactions and criticality of various components, a few other graphs can also be included in the report, such as network bandwidth & latency graphs, memory utilization graphs, disk / i-o utilization graphs for disk/i-o intensive operations, etc.

Best Practices

Automation with handy scripts

Script writing is an inherent part of any Performance Testing exercise. A lot of time is spent in ensuring the begin state of the test is proper. It might involve restarting servers, deleting extra data other than retention data, cleaning up log files, taking backup of some data, checking if some pattern exists in a log file, etc. Since each test needs to be run for 'n' number of times, automating these small tasks goes a long way in reducing time needed for each run.

Identify DB backups after crucial runs

During the course of Performance Testing activity there are bound to be different patches on application, database side. These changes are seemingly trivial but potentially devastating. It is a good idea to take the backup of data in the database and configuration files for the application before applying new patches to either application or DB.

Cross check Little's law

One of the basic queuing theory principles applied in SPE (Software Performance Engineering) is Little's law (a). It states that the total number of users in the system is equal to the product of throughput and response time. While calibrating your load test runs, one should always cross check the test results (throughput, response time, user-load simulated) to identify whether the load generator nodes themselves are not becoming the bottleneck in the system.

Designing scenarios to achieve right mix of transactions

Do not tune, if you don't have to.

There is a thin line separating Performance testing from Performance tuning. Unless really required, the tuning of various parameters of different components in the system should not be done. You will find many articles, which warn against tuning the systems. Most of the system components come with default values that are optimal. If we start looking for tuning of all the components, the duration of performance testing exercise will no longer be under control.

People Aspect

Performance Testing is a very strategic activity in the lifecycle of any Application. More often than not, you will have to deal with stakeholders who are apprehensive about the need of this activity, some people (especially DB, OS admins) who don't want the extra load this activity puts on them, software vendors who don't want additional defects on them, and many more. For the success of Performance Testing, it is important to take all these people along & explain (or thrust as the case might be) the inevitability of this exercise & how life would be easier when the application goes in production.

Environment availability is the biggest constraint which might force working in shifts, long hours, etc.

References

Authors

Alok Mahajan is Technical Architect with Infosys Technologies and specializes in Performance Engineering and Database designs. He has a total experience of more than7 years and has worked extensively on Performance Engineering assignments for more than 2 years, which uniquely positions him to write on the subject of performance. His areas of interest include Business Intelligence, Databases, Datawarehouse design/modeling.

Nikhil Sharma is Technical Architect with Infosys Technologies. For more than7 years, he has been involved in architecting and designing Enterprise Applications primarily on J2EE platform. For past2 years he has been working on Performance Engineering projects. He is also a Sun Certified Enterprise Architect for J2EE Platform (SCEA). His areas of interests are SOA, Integration Architectures, Portals.

Posted by tuning-java
,

요즘 Downstream Panic을 하고 있는데, 가끔씩 어려운 판들이 있어서...

필요하신 분들이 있을 것 같아 링크를 걸어 놓았다.

만든 애들도 머리가 좋고...

이걸 푼 애들도 머리가 좋고...


대부분 직접 풀기 바란다.

그래야 (잔)머리가 좋아지지...


If you want to see solutions, click below links.

Level 1~5

Level 6~10

Level 11~14

Level 15~19

Level 23~30

Level 31~40

Level 52

Level 54

Level 56

Level 58

Level 62

Level 70

Level 79
Posted by tuning-java
,

WebLogic Server Performance and Tuning
Weblogic의 성능 관련 세팅과 관련된 정보가 포함되어 있다.
http://edocs.bea.com/wls/docs92/perform/intro.html

참고로 Weblogic 8.X 이상에서 Thread 설정은 다음과 같이 한다.

Weblogic 콘솔에 로그인(보통 http://url/console 로 접근하면됨.)
-> domain 명에서 servers 를 확장후 해당 서버이름을 선택
-> Configuration 의 General tab 선택 -> 화면의 하단에 있는 Advanced의 show를 선택
-> 가장 하단의 Configure Execute Queues 를 선택
하면 Thread 관련 설정 화면으로 이동된다.

혹시 모르실 수도 있으니, DB Connection 관련 설정은 다음과 같이 한다.

Weblogic 콘솔에 로그인
-> Services 의 JDBC의 Connection Pools 에서 설정. (관련 설정이 없으면 새로 맹근다. ㅋㅋ)

Posted by tuning-java
,

점점 이 기능 저기능을 넣다 보면 Activity 클래스가 복잡해진다. 그 문제를 해결하기 위해서 아마도 구글에 그 똑똑하다는(? 정말?) 애들이 XML 기반의 레이아웃을 사용하는 방식을 쓴것 같다.

AndroidAPISummary 클래스에 있는 setButtons() 메소드를 다음과 같이 MainButtonManager 클래스를 만들어서 넣도록 하자.

package com.min.summary;

import android.app.AlertDialog;
import android.content.Intent;
import android.view.View;
import android.view.View.OnClickListener;
import android.view.ViewGroup.LayoutParams;
import android.widget.Button;
import android.widget.LinearLayout;
import android.widget.Toast;

public class MainButtonManager {
    AndroidAPISummary parent;
    LinearLayout parentLayout;

    LayoutParams lpFillWrap=new LinearLayout.LayoutParams(LayoutParams.FILL_PARENT, LayoutParams.WRAP_CONTENT);
    public MainButtonManager(AndroidAPISummary parent,LinearLayout  linearLayout) {
        this.parent=parent;
        parentLayout=linearLayout;
    }

    protected void setButtons() {
        Button alertButton=new Button(parent);
        alertButton.setText("Show alert");
        alertButton.setOnClickListener(new OnClickListener() {
            public void onClick(View view) {
                alertMessage("Clicked");
            }
        });
        parentLayout.addView(alertButton, lpFillWrap);

        for(int loop=0;loop<20;loop++) {
            Button but=new Button(parent);
            parentLayout.addView(but, lpFillWrap);
            but.setText("Button"+loop);
            but.setTag("Button"+loop);
            but.setOnClickListener(new OnClickListener() {
                public void onClick(View view) {
                    viewMessage("OK",Toast.LENGTH_SHORT);
                }
            });
        }
    }
    private void viewMessage(String data, int messageLength) {
        Toast t=Toast.makeText(parent,data,messageLength);
        t.show();
    }
    private void alertMessage(String data) {
        AlertDialog.show(parent, "This is a title 1", R.drawable.icon,
                "This is a message 2","Button text", true);
    }
}


여기서 중요한 것은 parent와 parentLayout이다.

이 클래스에는 this로 사용해야하는 AndroidAPISummary 객체와 버튼을 담아놓을 LinearLayout이 없기 때문에 Activity클래스에서 넘겨주어야만 한다.

그럼 바뀐 AndroidAPISummary 는 어떻게 바뀌었을까?

package com.min.summary;

import android.app.Activity;////
import android.os.Bundle;////

import android.view.Menu;
import android.view.ViewGroup.LayoutParams;
import android.widget.LinearLayout;
import android.widget.ScrollView;
public class AndroidAPISummary extends Activity {
    LinearLayout  linearLayout;
    LayoutParams lpFillWrap=new LinearLayout.LayoutParams(LayoutParams.FILL_PARENT, LayoutParams.WRAP_CONTENT);
    MenuManager menuManager;
    /** Called when the activity is first created. */
    @Override
    public void onCreate(Bundle icicle) {
        super.onCreate(icicle);
        ScrollView sv=new ScrollView(this);
        linearLayout=new LinearLayout(this);
        linearLayout.setOrientation(LinearLayout.VERTICAL);
        MainButtonManager mbManager=new MainButtonManager(this,linearLayout);
        mbManager.setButtons();
        sv.addView(linearLayout,lpFillWrap);
        setContentView(sv);
    }

    public boolean onCreateOptionsMenu(Menu menu) {
        boolean result = super.onCreateOptionsMenu(menu);
        menuManager=new MenuManager(menu);
        return result;
    }

}

보다 AndroidAPISummary 클래스가 간결해진 것을 확인할 수 있다.

Posted by tuning-java
,

이번에는 메뉴를 만들어보자.

android.view.Menu 클래스는 핸드폰에 있는 "Menu" 버튼을 클릭할 때 나타나는 메뉴를 처리하는데 사용된다.

메뉴를 추가하는 메소드는 다음과 같다.

Item  add(int group, int id, CharSequence title, Runnable callback)
Item  add(int group, int id, CharSequence title, int iconRes)
Item  add(int group, int id, int titleRes, int iconRes)
Item  add(int group, int id, CharSequence title)
Item  add(int group, int id, int titleRes)
Item  add(int group, int id, int titleRes, Runnable callback)

메뉴를 생짜베기로 Activity 클래스에 추가할 순 있지만, 개인적으로 보기에는 메뉴를 관리하는 클래스를 따로 추가하여 사용하는 것이 좋다고 생각한다.

그럼 다음과 같은 클래스를 추가해보자.

package com.min.summary;

import android.view.Menu;
import android.view.SubMenu;

public class MenuManager {
    Menu.Item menuItem1;
    Menu.Item menuItem2;
    SubMenu subMenu1_1;
    SubMenu subMenu1_2;
    SubMenu subMenu2;
    public MenuManager(Menu menu) {
        int pos=0;
        menuItem1=menu.add(0, Menu.FIRST+pos++, "Menu-1");
        menuItem2=menu.add(0, Menu.FIRST+pos++, "Menu-2");
        subMenu1_1=menu.addSubMenu(0, Menu.FIRST+pos++, "Sub menu-1_1");
        subMenu1_2=menu.addSubMenu(0, Menu.FIRST+pos++, "Sub menu-1_2");
        subMenu2=menu.addSubMenu(1, Menu.FIRST+pos++, "Sub menu-2");
    }
}

뭔지 모르시겠지만, 일단 이렇게 해보자.

그럼 이제 이 클래스를 써야겠죠?

package com.min.summary;

import android.app.Activity;////
import android.content.Intent;
import android.os.Bundle;////

import android.app.AlertDialog;

import android.view.Menu;
import android.view.View;
import android.view.View.OnClickListener;
import android.view.ViewGroup.LayoutParams;
import android.widget.LinearLayout;
import android.widget.Button;
import android.widget.ScrollView;
import android.widget.Toast;
public class AndroidAPISummary extends Activity {
    LinearLayout  linearLayout;
    LayoutParams lpFillWrap=new LinearLayout.LayoutParams(LayoutParams.FILL_PARENT, LayoutParams.WRAP_CONTENT);
    MenuManager menuManager;
    // 중간 생략

    public boolean onCreateOptionsMenu(Menu menu) {
        boolean result = super.onCreateOptionsMenu(menu);
        menuManager=new MenuManager(menu);
        return result;
    }
    // 이하 생략
}

AndroidAPISummary 클래스의 변수로 menuManager를 만들자. 물론 해당 변수의 타입은 MenuManager 클래스이다. 
그리고 중점적으로 봐야하는 것은 onCreateOptionsMenu() 메소드이다.  위의 예와 같이 onCreateOptionMenu() 메소드를 Overridding하고, 메뉴 설정해주면 안드로이드에서 메뉴가 나타난다. 


이제 에뮬레이터를 띄워서 결과를 확인해볼까?

이제 메뉴를 클릭하면 어떤 이벤트를 처리해야 하는데, 다른 이벤트 처리방법과 비슷하다.
(솔직히 이부분은 아직 구현할 필요가 없어서 잘 모르겠다. )
나중에 시간되면 정리해야지...

Posted by tuning-java
,

구글 안드로이드라는 걸 공부하다보면, ddms라는걸 들어보았을 것이다.
(앞서 내가 번역한 툴들의 목록중에 ddms라는게 있다는 것을 확인할 수 있다.)

ddms를 사용하는 방법은 두가지가 있다. 이클립스에서 사용하는 것과 android의 tools 디렉토리에 있는 ddms.bat 파일을 실행하는 두가지 방법이다.

다음 그림은 이클립스에서 돌리는 화면이다.

그럼 아래의 그림은 배치파일을 실행해서 사용하는 화면이다.

여기서 굉장히 유의할 점이 있다.

나도 이거 아는데 좀 시간이 걸렸다. ㅋㅋㅋ

이클립스에서 에뮬레이터를 띄워놓고 배치파일 기반의 ddms를 돌리면 이클립스에서 콘솔이 정신을 차리지 못하면서 난리를 치기 시작할 것이다.

못믿겠으면 확인해 보기 바란다.

어느정도 힌트를 드렸으니, 한번 해결책을 찾아보세요. ㅋㅋ


다른 사용법은 나도 잘 모른다.

아직까지는 단지 화면 캡쳐용으로 사용할 뿐이다.

이클립스용에서 X 자 빨간색 표시 옆에 잘 찾아보면 메뉴가 나타나는데, 그 메뉴를 누르면 "Screen Capture"를 클릭하면 다음과 같은 화면 캡쳐 화면이 나타난다.


refresh를 눌러야만 현재 에뮬레이터의 화면이 나타난다는 사실을 알고 계시기 바란다.


그럼 마지막으로 이클립스에서 어떻게 하면 ddms 화면이 나타날까?

그것도 한번 여러분들이 직접 찾아 보기 바란다. ㅋㅋ

Posted by tuning-java
,

참고로 이 설명은 [Blog2Book 자바 성능을 결정짓는 코딩 습관과 튜닝 이야기] 책을 읽는 독자분들이 부록으로 제공되는 DevPartner for Java를 보다 쉽게 사용할 수 있도록 작성되었으며, 설치시 14일간 기능의 제한이 없는 임시 라이센스가 생성됩니다.

DevPartner 서버 (실제론 톰캣 서버다.)가 제대로 기동되고 있는 상황에서(DevPartner 관리 페이지가 뜨는 상황에서) 프로파일링이 가능하다.

시작하기 전에 앞서 알려드렸던 윈도우즈 서비스 목록에 관련 서비스가 시작되어 있는지 확인하는 것이 좋다.

프로파일링 하는 방법은 크게 두가지 인데, 한가지는 Administrator 툴에서 WAS관련 값을 지정하는 방법이다. 한번 지정하면 다음부터는 클릭만으로 서버를 띄울수 있어 편리하다. 하지만 난 이 기능을 안쓴다. 한 사이트에 가서 있어 봤자 며칠 안되기 때문에...

다른 방법은 nmshell을 사용하는 방법이다. nmshell은 윈도우나 Unix의 커맨드 창에서 이 명령어를 수행하면 이름 그대로 하나의 가상 shell이 추가된다.
(기본적으로 DevPartner를 깔면 nmshell이 있는 DevPartner의 bin 디렉토리가 "Path"에 잡히기 때문에 그냥 아무데서나 실행하면 된다.)
그냥(아무 옵션 없이) nmshell을 수행하면 다음과 같은 결과가 나온다.

C:\Program Files\Compuware\DevPartner Java Edition\bin>nmshell
DevPartner Java Edition Utility that profiles arbitrary commands

  Usage:

      nmshell [DPJ Options] -config <name>
          Launches a new shell from which all Sun(R) Java(tm) apps
          will be profiled by DPJ

      nmshell [DPJ Options] -config <name> -exec <command> [<param>...]
          Runs <command> with specified params under DPJ profiling

  DPJ Options:

      -config <name>    Run under configuration named 'name'
      -perf     Profile CPU performance (default)
      -mem      Profile memory usage
      -cov      Profile code coverage
      -batch    Run in batch mode (do not bring up DPJ UI)
      -nmv      Verbose operation
      -help     Displays this text

C:\Program Files\Compuware\DevPartner Java Edition\bin>

보면 알겠지만, -perf 옵션을 주면 성능 프로파일링을, -mem 옵션을 주면 메모리 프로파일링을, -cov 옵션을 주면 커버리지 프로파일링을 한다. 그리고 가장 중요한 것은 -config를 하고 나서 이름을 지정하는 것이다. 여기서의 이름은 DevPartner 의 UI에서 만든 config 이름이다. (이 config에 대해서는 나중에 시간나면 자세히 설명을 올려놓겠다.)

WAS를 띄우기 전에 다음과 같이 수행을 한다.

nmshell -config Test -perf

이렇게 지정을 하면 성능 측정을 하고 "Test"라고 지정되어 있는 config 조건에 맞는 성능 측정을 한다는 의미가 된다.

그럼 화면이 떴을때 부터 하는 일은 다음에 정리하겠다.

Posted by tuning-java
,

예를 들어서 다음과 같은 데이터가 있을 때 (여기서 A 는 열의 이름)

A

aaa
aaa
bbb
ccc
ddd
ddd
eee
fff

각 항목, 그러니까 aaa, bbb, ccc, ddd, eee, fff 가 몇개인지 확인하는 방법은 다음과 같다.

이 경우 데이터가 몇개 안되니까 눈으로 보면 되지만, 만약 Access log와 같이 URL 데이터가 많이 있을 때, 어떤 URL이 많이 호출되는지를 확인할 때 그걸 일일이 더하는건 바보같은 짓이다.

1. 가장먼저 해당 열을 다른 시트에 복사한다.

2. 그 다음 다른 시트의 A 열을 클릭한 후(A 열을 모두 선택하도록...)

3. 메뉴에서 "데이터 --> 중복된 항목 제거"를 선택한다. 그럼 다음과 같이 된다.

A

aaa
bbb
ccc
ddd
eee
fff

4. 그럼 우리가 원하는 각 항목들만 남아있게 된다. (중복된걸 제거 했으니까)

5. 마지막으로
추가된 시트의 B 행에 다음과 같이 수식을 추가한다.
=COUNTIF(원본탭!A:A,A2)
여기서 "원본탭" 은 원래 중복된 항목을 제거하지 않은 탭의 이름.
A:A는 중복된 항목을 제거하지 않은 열
A2는 중복된 항목이 제거된 셀의 위치이다. 여기서는 aaa가 있는 셀의 이름이다.

6. 이 식을 아래 줄에도 복사하면 모든 작업이 끝난다.

^^;

Posted by tuning-java
,

일단 다음의 링크를 클릭하면 Microsoft Log Parser 2.2를 다운로드 받을 수 있으니, 없으면 받자.

http://www.microsoft.com/downloads/details.aspx?FamilyID=890cd06b-abf8-4c25-91b2-f8d975cf8c07&displaylang=en

설치를 하면 LogParser.exe파일이 지정한 디렉토리에 생성될 것이다.


간단한 예제를  보려면 아래 링크를 클릭하자.

http://www.microsoft.com/technet/scriptcenter/tools/logparser/lpexamples.mspx

약간 특이한 툴이라는 것을 직감할 수 있을 것이다.

쉽게 이야기하자면, IIS 서버와 같은 웹서버의 로그를 Query(쿼리) 형태의 질의어를 통해서 원하는 형태의 파일로 정리해 주는 유용한 툴이다.

Window IIS의 로그파일이 있는 곳(여기서는 54.log가 로그파일이다.) 에서 다음과 같은 명령을 수행해 보자.
"C:\Program Files\Log Parser 2.2\LogParser.exe" "SELECT * FROM 54.log TO 54.csv"
이렇게 하면 모든 로그를 54.csv라는 파일에 엑셀에서 볼 수 있는 CSV 파일 형태로 변환해 준다.

자세한 내용은 나중에 시간 있을 때 정리해야 겠다.

Posted by tuning-java
,

기본적으로 웹 서버에 설정되어 제공되는 웹로그에는 응답시간이 나오질 않는다.

그런 단점을 해결하기 위해선 로그를 수정해야만 제대로된 응답시간 분석이 가능하다.

어떤 옵션을 수정해야 하는지 다음의 링크를 통해서 확인해 보기 바란다.

http://httpd.apache.org/docs/2.0/mod/mod_log_config.html#formats

자세한 내용은 책에 있다. ㅋㅋㅋ

Posted by tuning-java
,


Blog2Book 자바 성능을 결정짓는 코딩 습관과 튜닝 이야기 책에 있는 소스 코드들이다.

혹시 잘못된 부분이 있으면 이야기해 주세요.

수정해서 올리겠습니다.

modified 2008.10.15. Because of StopWatch's Bug
Posted by tuning-java
,
http://www.w3schools.com/js/default.asp

이 사이트에 들어가면,

좌측의 메뉴를 통해서,

모든 자바 스크립트의 함수들을 사용하는 방법에 대해서 상세하게 정리되어 있다.

각 HTML개체에 대해서 사용하는 방법은 아래 링크에 있다.

http://www.w3schools.com/htmldom/default.asp

그리고 이 사이트에서 가장 좋은 부분은 자바 스크립트 레퍼런스 부분이다.

그 내용은 아래 링크에서 확인하면 된다.

http://www.w3schools.com/jsref/default.asp


Posted by tuning-java
,

모든 UI를 구성하는데 있어서 반드시 필요한 것은 많지만, 개발하면서 가장 필요한 것은 로그를 보는 것일 것이다. 아직까지 로그 처리를 어떻게 해야하는지는 정확하게 감이 잡히질 않는다. 하지만, 로그를 콘솔에서 보는 방법 이외에 가장 편하게 보는 것이 alert 창일 것이다.

지금까지 확인해 본 안드로이드의 메시지를 처리하는 방법은 두가지이다.

하나는 AlertDialog를 사용하는 것이고, 다른 하나는 Toast를 사용하는 것이다.

package com.min.summary;

import android.app.Activity;////
import android.content.Intent;
import android.os.Bundle;////

import android.app.AlertDialog;
import android.view.View;
import android.view.View.OnClickListener;
import android.view.ViewGroup.LayoutParams;
import android.widget.LinearLayout;
import android.widget.Button;
import android.widget.ScrollView;
import android.widget.Toast;
public class AndroidAPISummary extends Activity {
    LinearLayout  linearLayout;
    LayoutParams lpFillWrap=new LinearLayout.LayoutParams(LayoutParams.FILL_PARENT, LayoutParams.WRAP_CONTENT);
    /** Called when the activity is first created. */
    @Override
    public void onCreate(Bundle icicle) {
        super.onCreate(icicle);
        ScrollView sv=new ScrollView(this);
        linearLayout=new LinearLayout(this);
        linearLayout.setOrientation(LinearLayout.VERTICAL);
        setButtons();
        sv.addView(linearLayout,lpFillWrap);
        setContentView(sv);
    }
    private void setButtons() {
        Button alertButton=new Button(this);
        alertButton.setText("Show alert");
        alertButton.setOnClickListener(new OnClickListener() {
            public void onClick(View view) {
               alertMessage("This is a message-2");
            }
        });
        linearLayout.addView(alertButton, lpFillWrap);
        for(int loop=0;loop<20;loop++) {
            Button but=new Button(this);
            linearLayout.addView(but, lpFillWrap);
            but.setText("Button"+loop);
            but.setTag("Button"+loop);
            but.setOnClickListener(new OnClickListener() {
                public void onClick(View view) {
                   viewMessage("OK",Toast.LENGTH_SHORT);
                }
            });
        }
    }
   

    private void alertMessage(String data) {
        AlertDialog.show(this, "This is a title", R.drawable.icon,
                data,"Button text", true);

    }

    private void viewMessage(String data, int messageLength) {
        //Toast.LENGTH_LONG
        Toast t=Toast.makeText(this,data,messageLength);
        t.show();
    }
   
}

앞에서 만들었던 AndroidAPISummary 클래스에 위와 같이 추가했다.


다른 레이아웃 설정부분과의 혼동을 피하기 위해서 버튼 설정하는 부분을 다른 메소드로 추가하였다.(setButtons() 메소드를 추가)

먼저 메시지를 처리하기에 앞서 이벤트를 처리하는 부분에 대해서 알아보자.
Button의 클릭 이벤트를 처리하기 위해서는 setOnClickListener 메소드를 사용해야만 한다. 이 메소드를 사용할때 필요한 매개변수 객체가 OnClickListener 인데, 인터페이스이므로, 이 인터페이스를 다른 클래스로 정의하거나, 위의 소스와 같이 필요할 때 구현하여야만 한다. (일반적으로 자바에서 화면단 이벤트를 처리하기 위해서는 저렇게 많이 구현해서 사용한다.)

내부적으로 정의한 OnClickListener의 내용은 프로그램이 구동될 때 수행되는 것이 아니라, 해당 이벤트가 호출되었을 때에만 구동되기 때문에, "수행하면 어쩌지?"라는 걱정은 하지 않아도 된다.


onClick 메소드는 View 객체를 받아서 처리되도록 되어 있으며, 매개변수로 받은 View는 해당 메소드에서 사용할 수 있다. 여기서 alertButton의 setOnClickListener 메소드에서는 alertMessage() 메소드를 호출했으며, 나머지 버튼들에서는 viewMessage() 메소드를 호출하도록 되어 있다.


그럼 이제 Toast와 AlertDialog에 대해서 알아보자.

Toast는 잠시 나타났다가 사라지는 메시지를 보여준다. static한 방법을 사용하면 되고, makeText() 라는 메소드에다가 메시지와 메시지를 뿌려줄 기간을 지정한다.
static  Toast  makeText(Context context, int resId, int duration)
static  Toast  makeText(Context context, CharSequence text, int duration)
duration은 Toast.LENGTH_SHORT 나 Toast.LENGTH_LONG 을 지정하면 된다.

Toast를 쓴 예제는 다음과 같다.

중간에 있는 조그만 OK 가 Toast로 띄운 메시지이다.


AlertDialog는 버튼이 있는 메시지창을 보여준다. 이것도 마찬가지로 static 한 방법으로 사용하면 되고, show() 라는 메소드에다가 여러가지 방법으로 지정하면 된다.
show()메소드의 종류는 다음과 같다.  여러분들의 입맛에 맞게 골라서 사용하기 바란다.
static  AlertDialog  show(Context context, CharSequence title, int iconId, CharSequence message, CharSequence button1Text, OnClickListener button1Listener, CharSequence button2Text, OnClickListener button2Listener, CharSequence button3Text, OnClickListener button3Listener, boolean cancelable, OnCancelListener cancelListener)

static  AlertDialog  show(Context context, CharSequence title, int iconId, CharSequence message, CharSequence buttonText, boolean cancelable)

static  AlertDialog  show(Context context, CharSequence title, int iconId, CharSequence message, CharSequence buttonText, OnClickListener buttonListener, boolean cancelable, OnCancelListener cancelListener)

static  AlertDialog  show(Context context, CharSequence title, int iconId, CharSequence message, CharSequence button1Text, OnClickListener button1Listener, CharSequence button2Text, OnClickListener button2Listener, boolean cancelable, OnCancelListener cancelListener)

static  AlertDialog  show(Context context, CharSequence title, Drawable icon, View view, CharSequence buttonText, OnClickListener buttonListener, CharSequence button2Text, OnClickListener button2Listener, CharSequence button3Text, OnClickListener button3Listener, boolean cancelable, OnCancelListener cancelListener)

static  AlertDialog  show(Context context, CharSequence title, int iconId, View view, CharSequence buttonText, OnClickListener buttonListener, CharSequence button2Text, OnClickListener button2Listener, boolean cancelable, OnCancelListener cancelListener)

static  AlertDialog  show(Context context, CharSequence title, int iconId, View view, CharSequence buttonText, OnClickListener buttonListener, CharSequence button2Text, OnClickListener button2Listener, CharSequence button3Text, OnClickListener button3Listener, boolean cancelable, OnCancelListener cancelListener)


참고로 CharSequence에는 String이나 StringBuffer, StringBuilder를 넘겨주면 되고, OnClickListener 에는 원하는 버튼의 Listener를 만들어서 그 Listener를 지정해주면 된다. 그리고, 마지막에 cancelable 이라는 boolean 값이 있는데, 그 값은 전화기의 종료버튼 위에 있는 <- 방향의 버튼을 눌렀을때 작동이 되는지 여부를 설정한다. 만약 true로 해 놓으면, 취소가 가능하다.

AlertDialog의 예는 다음과 같다.

중간에 있는 저 버튼을 포함한 box가 AlertDialog를 이용한 화면이다.

Posted by tuning-java
,
티스토리의 플러그 인 중에 이미지를 클릭했을때 같은창 안에서 내용이 나타나도록 해주는 Light TT EX 라는 것이 있다.

나는 Windows Live Wrtier를 사용하기 때문에, 이미지를 추가하고, 글을 업로드를 하더라도 Lightbox plus가 제대로 작동이 되지 않는다.

이 경우에 티스토리에 있는 에디터를 열자.
에디터를 열어서 우측 상단에 있는 "EDIT"를 누르면 "HTML"모드로 변경된다.

그럼 아래와 같은 링크 부분을 찾을 수 있다.
<A href="/파일명1.png">
<img class="tatterImageFree" longdesc="/" src="/owner/entry/previewAttachment/?filename=파일명2.png" height="233" />
</A>

이부분을 다음과 같이 수정하면 원하는 기능이 제대로 작동된다.

[## _1C|파일명1.png|height="233"|_ ##]

참고로 여기서 #과 _ 사이에는 공백을 제거해야 한다.

그냥 그대로 적어놓으면 특수 태그로 인식하기 때문에 공백을 두었다.


혹 원하는 분을 위해서 converter를 만들었으니 첨부를 확인하기 바란다.
Posted by tuning-java
,

지금까지의 내용들은 구글 안드로이드와 함께 제공되는 문서 위주로 정리가 되었다. 하지만, 이제부터는, 본인이 직접 내 입맛에 맞게 각 API에 대해서 작성할 예정이다. 혹시 나머지 Document부분의 번역을 원하시는 분들이 많을 경우 추가로 작성할 예정이다.


이제 연습용 메인 프로젝트를 만들어 보자. 이클립스에서 New Project를 선택해서 Android Project를 만들자.

프로젝트 명은 AndroidAPISummary, 패키지 이름은 com.min.summary , 메인이 되는 액티비티 이름은 AndroidAPISummary, 그리고 안드로이드에서 아이콘에 나타나는 이름은 API Summary 로 정하자. 마지막에 있는 애플리케이션이름만 공백 사용이 가능하다.

Finish 버튼을 누르자. 그러면, HelloAndroid와 같이 여러개의 파일이 생성될 것이다.


참고로 나는 SWT, GWT, Swing등을 사용했기 때문에 화면 레이아웃을 XML로 처리하는 것에 적응이 되어 있지 않다. 대부분의 화면단 개발자 분들이 그러하듯이... 그리고, 안드로이드의 대부분 샘플들도 모두 XML로 화면처리를 했기 때문에 나는 소스에서 화면 구성하는 방법으로 정리를 하도록 하겠다.


가장 먼저 AndroidAPISummary 클래스를 열어서 다음과 같이 수정하자. 아래에 굵게 표시한 부분만 추가된 내용이다.

package com.min.summary;

import android.app.Activity;
import android.os.Bundle;
import android.view.ViewGroup.LayoutParams;
import android.widget.LinearLayout;
import android.widget.Button;

public class AndroidAPISummary extends Activity {
    LinearLayout  linearLayout;
    LayoutParams lpFillWrap=new LinearLayout.LayoutParams
        (LayoutParams.FILL_PARENT, LayoutParams.WRAP_CONTENT);
    /** Called when the activity is first created. */
    @Override
    public void onCreate(Bundle icicle) {
        super.onCreate(icicle);
       linearLayout=new LinearLayout(this);
        linearLayout.setOrientation(LinearLayout.VERTICAL);
        for(int loop=0;loop<20;loop++) {
            Button but=new Button(this);
            linearLayout.addView(but, lpFillWrap);
            but.setText("Button"+loop);
        }
        setContentView(linearLayout);

    }
}

일단 가장 간단한 LinearLayout을 사용하였고,
LayoutParams 라는 클래스의 객체는 LinearLayout에서 View를 추가할 때 필요하기 때문에, 클래스 변수로 지정하여 재사용 하도록 했다.
onCreate() 메소드에서 linearLayout 객체를 초기화 하고, 세로 정렬하도록 setOrientation() 메소드를 사용하여 LinearLayout.VERTICAL 변수를 지정하였다.
(참고로 LinearLayout.HORIZONTAL 로 지정하면 가로로 정렬하게 된다.)
그 다음엔 for 루프를 사용해서 Button을 20개 만들어 linearLayout에 추가하였다. addView() 메소드를 사용하여 추가할 때에는 LayoutParams 로 반드시 어떻게 추가할지를 결정해야 한다. 그리고 버튼 객체에 setText() 메소드를 사용하여 버튼에 나타나는 글자를 표시하도록 했다.
마지막에는 linearLayout를 setContentView() 메소드를 사용하여 화면에 나타나도록 지정했다.

그러면 이렇게 만든 화면을 수행하면 어떻게 되는지 결과 화면을 보자.

이렇게 버튼을 20개나 만든 이유는 여러분들에게 중요한 한가지를 보여주기 위함이다. 화면이 나타난 상태에서 스크롤을 해보자.

아마 선택된 주황색 표시가 없어질 것이다.

즉 스크롤이 안된다는 의미가 된다. 그냥 이대로 사용하게 되면, 버튼들이 추가되거나, 데이터가 추가되면 스크롤이 안되는 안습상황이 발생하게 될 것이다.

그래서 필요한 것이 ScrollView 다.

package com.min.summary;

import android.app.Activity;
import android.os.Bundle;
import android.view.ViewGroup.LayoutParams;
import android.widget.LinearLayout;
import android.widget.Button;
import android.widget.ScrollView;

public class AndroidAPISummary extends Activity {
    LinearLayout  linearLayout;
    LayoutParams lpFillWrap=new LinearLayout.LayoutParams(LayoutParams.FILL_PARENT,
        LayoutParams.WRAP_CONTENT);
    /** Called when the activity is first created. */
    @Override
    public void onCreate(Bundle icicle) {
        super.onCreate(icicle);
        ScrollView sv=new ScrollView(this);
        linearLayout=new LinearLayout(this);
        linearLayout.setOrientation(LinearLayout.VERTICAL);
        for(int loop=0;loop<20;loop++) {
            Button but=new Button(this);
            linearLayout.addView(but, lpFillWrap);
            but.setText("Button"+loop);
        }
       sv.addView(linearLayout,lpFillWrap);
        setContentView(sv);
    }
}

변경된 소스와 같이 ScrollView를 import하고, ScrollView를 추가하면 된다.

그럼 이렇게 했을때 결과를 보자.

이제 스크롤을 해보면 아래에 화면이 있으면 어둑어둑하게 표시가 되면서 스크롤이 부드럽게 될 것이다.

내용이 너무 많으면 지겨우니, 추가적인 내용은 다음 post에 올리도록 하겠다.

Posted by tuning-java
,


Workspace in use or cannot be created, choose a different one. 이라는 메시지가 나타나면서, 이클립스에서는 다른 workspace를 선택하라는 화면이 나온다.

이 경우에는 평소에 사용하는 workspace를 변경해야만 이클립스가 기동되는데, 대부분의 개발자분들이 그런 짓(?)을 하기는 싫을 것이다.


가장 쉬운 해결책
윈도우 작업 관리자를 열어서 eclipse.exe 프로세스를 죽인다.


두번째 해결책
자기가 정해놓은 workspace 디렉토리로 이동해서, .metadata 라는 디렉토리에 있는 .lock 파일을 지운다.


둘중 한 방법을 사용하면 정상적으로 이클립스가 기동된다.

Posted by tuning-java
,

다른 UI API와 동일하게 안드로이드도 레이아웃을 제공한다. 어떤 레이아웃들이 있는지 확인해 보자.

FrameLayout

FrameLayout은 가장 단순한 레이아웃 객체이다. 이 레이아웃은 위치를 지정할 수 없고, 모든 자식 요소들은 무조건~~~~ 좌측 상단 구석에 배치된다.


LinearLayout

이 레이아웃의 모든 자식 요소들은 단일 방향으로 배치된다. 즉 가로나 세로로 배치된다는 의미이다. 자세한 내용은 나중에 구현하면서 확인해보자.


TableLayout

이 레이아웃은 자식 요소들을 열이나 행에 배치시킨다. 하지만, 일반 표처럼 선을 기본적으로 표시하지 않는다. 그리고, 각각의 셀을 비운 상태로 유지할 수는 있지만, 열의 크기를 지정할 수 없다.


AbsoluteLayout

좌측 상단 구석을 (0,0)으로 시작하는 절대 위치로 요소들을 배치하는 레이아웃이다. 여백은 지원하지 않으며, 각각의 요소가 서로 겹치는 것은 허용되지만, 별로 권장하지는 않는다.


RelativeLayout

말 그대로 상대 위치를 지정하는데 사용된다.


중요한 뷰 그룹의 목록

중요한 뷰 그룹의 목록은 다음과 같다.

AbsoluteLayout : 앞에서 이야기 했다.

FrameLayout : 이것도 앞에서...

Gallery : 그림들의 목록을 보여주기 위한 뷰

GridView : m개의 열과 n개의 행을 갖는 뷰

LinearLayout : 이것도 앞에서 설명했다.

ListView : 스크롤 되는 단일 열의 목록을 보여주는 뷰

RelativeLayout : 이것도 앞에서.

ScrollView : 세로로 스크롤되는 요소의 열

Spinner : 바운드 목록 중 단일 아이템을 나타내는 뷰.(바운드 목록이 뭔지는 잘 모르겠다.)

SurfaceView : 직접 화면에 그릴 수 있는 접근을 제공하는 뷰. 최 상위 화면에는 레이어가 있는 자식 뷰를 가질수는 있으나, 위젯을 사용하지 않고 점 단위의 그림을 그릴때 사용된다.

TabHost : 다른 UI API와 같은 탭을 제공한다.

TableLayout : 앞에서...

ViewFlipper : 한개의 아이템을 한번에 보여주는 리스트 뷰이다. 슬라이드 쇼와 같이 각각의 아이템을 시간차를 두고 변경가능하다.

ViewSwitcher : ViewFlipper와 동일하다(그럼 왜만들었을까???)


(각각에 대한 내용은 아래의 참조 URL을 참조하기 바란다.)


이 내용은 http://code.google.com/android/devel/ui/layout.html 을 바탕으로 재구성 되었습니다.

Posted by tuning-java
,

안드로이드 애플리케이션의 기본 단위는 액티비티(android.app.Activity) 이다.  액티비티에서는 많은 일을 할 수 있지만, 액티비티 자체는 화면 내용을 담고 있는 것이 없다. 액티비티에서 화면을 구성하고 디자인하기 위해서는  안드로이드 플랫폼 UI 표현의 가장 기본단위인 view들과 viewgroup들을 사용해야 한다.


View

View는 android.view.View 클래스의 객체이다. 이 객체에는 기본적으로 레이아웃과 해당 뷰가 위치하는 지역(4각 지역)을 확인한다.

뷰 객체는 측정, 레이아웃, 포커스 변경, 스크롤, 스크린에서의 키 및 행위에 대해서 처리한다.

뷰 클래스는 widgets 클래스를 기반으로 제공된다. 위젯은 자신의 측정및 그리는 것에 대한 처리를 수행하기 때문에, UI를 보다 빠르게 그리고 사용할 수 있도록 해준다. Text, EditText, InputMethod, MovementMethod, Button, RadioButton, Checkbox, ScrollView 위젯이 이에 속한다.


Viewgroups

뷰 그룹은 android.view.Viewgroup 클래스의 객체이다. 이름이 의미하는데로, 뷰 그룹은 뷰나 다른 뷰그룹의 객체를 담고 관리하는 일을 한다. 단일 화면을 구성하는 복잡한 요소들을 포함할 수 있도록 도와주는 일을 이 클래스에서 담당한다.

layouts 라는 클래스에 기반을 두고 있다.


참고로 이 내용은  http://code.google.com/android/devel/ui/hierarchy.html 를 참조했으며, 각 뷰의 계층에 대한 나머지 설명은 이 URL을 참조하기 바란다.

Posted by tuning-java
,

대부분의 경우 안드로이드는 자신의 리눅스 프로세스 내에서 수행된다.

애플리케이션 프로세스의 라이프타임은 애플리케이션 자신에 의해서 콘트롤되지 않고, 시스템에 의해서 관리된다.

애플리케이션의 컴포넌트(앞서 배운 액티비티나 서비스 같은 것들)가 어떻게 각각 어떻게 다른지를 이해하는 것은 굉장히 중요하며, 이 컴포넌트들을 제대로 사용하지 않을 경우 시스템이 중요한 일을 할때 시스템이 죽어버릴 수도 있다.

프로세스 라이프 사이클의 버그중 가장 일반적인 것은 IntentReceiver를 onReceiveIntent() 메소드 호출을 통해서 시작하는 경우이다. 이렇게 시작하게 되면, 시스템에서는 IntentReceiver가 더이상 유효하지 않다고 생각하게되고, 해당 프로세스는 언젠가 시스템에 의해서 죽을 수도 있다. 이러한 실수를 방지하기 위해서는 Service를 IntentReceiver를 사용해서 시작해야한다 그러면, 작업을 수행하는 동안 해당 작업은 계속 일을 하고 있다는 상태를 시스템이 알 수 있게 되기 때문이다.


메모리가 부족할때 어떤 프로세스가 죽어야하는지에 대해서 정의하는 것은 "중요도 순서(Importance hierarchy)"에 의해서 결정된다. 중요도의 순서는 다음과 같다.

각각의 내용에 대해서는 http://code.google.com/android/intro/lifecycle.html 를 참조하기 바란다.

  1. foreground process
  2. visible process
  3. service process
  4. background process
  5. empty process

프로세스를 분류를 정의할때, 현재 살아있는 프로세스중에서 시스템은 가장 중요한 레벨을 선택한다. Activity, Serivce, IntentReceiver 문서를 보면 어떻게 각각의 컴포넌트가 전체 프로세스의 사이클에서 사용되는지를 자세하게 알 수 있다.


참고 : 이 내용은 http://code.google.com/android/index.html 의 내용을 참조하여 작성되었음

Posted by tuning-java
,

안드로이드 개발 툴 킷에 포함되어 있는 개발 툴은 종류도 많다.

Android Emulator

이 툴은 모바일 디바이스가 없이 개발할때 필요한 툴로 개발한 화면 확인 및 디버그, 테스트를 할 때 필요하다.


Eclipse 에 포함되는 플러그인(Android Development Tools Plugin. 줄여서 ADT)은 먼저 종류만 나열하면 다음과 같다.

Dalvik Debug Monitor Service (ddms)

Android Debug Bridge (adb)

Android Asset Packaging Tool (aapt)

Android Interface Description Language (aidl)

sqlite3

Traceview

mksdcard

dx

activityCreator


그럼 각각에 대해서 알아보자.

Dalvik Debug Monitor Service (ddms)
에뮬레이터나 디바이스에서 프로세스를 관리하고, 디버깅을 지원하는데 사용된다.
프로세스를 죽이거나, 디버그할 특정 프로세스를 지정하거나, trace 데이터를 생성하거나, 힙이나 쓰레드 정보보기, 에뮬레이터나 디바이스의 스크린샷을 찍는등의 작업을 할수 있다.

Android Debug Bridge (adb)
본인이 작성한 애플리케이션의 .apk 파일을 에뮬레이터나 디바이스에 인스톨하거나 커맨드 명령을 통해서 에뮬레이터나 디바이스에 억세스할때 사용된다.
에뮬레이터나 디바이스에서 수행되는 소스를 표준 디버거와 연결하는 역할도 수행을 한다.

Android Asset Packaging Tool (aapt)
안드로이드 애플리케이션의 바이너리와 리소스를 포함하는 .apk 파일을 생성하는 툴이다.

Android Interface Description Language (aidl)
내부 프로세스 인터페이스를 위한 코드를 생성해주는 툴이다.

sqlite3
SQLite 데이터 파일에 접근하는데 도움을 주는 툴이다.

Traceview
안드로이드 애플리케이션에서 제공하는 trace 로그의 분석 그래프를 제공한다.

mksdcard
에뮬레이터에서 SD 카드와 같은 외부 저장장치를 시뮬레이트하여 디스크 이미지를 생성해준다.

dx
.class 파일을 안드로이드 바이트 코드인 .dex파일로 생성해주는 툴이다.

activityCreator
Ant 빌드파일을 생성해주는 스크립트이다. ADT를 사용하면 필요없는 툴이다.


참고 : 이 내용은 http://code.google.com/android/index.html 의 내용을 참조하여 작성되었음

Posted by tuning-java
,

안드로이드는 4개의 블록(block)으로 구성된다.

  • Activity
  • Intent Receiver
  • Service
  • Content Provider

    근데 왜 블록이라고 하는지는 잘 모르겠다.

    여하튼 모든 블록이 필요하진 않다고 이야기는 하는데, 몇몇가지의 조합으로 어플리케이션이 구성 가능하다고 한다.

    필요한 컴포넌트를 추가할 경우에는 반드시 AndroidManifest.xml 이라는 파일에 추가하여 작업을 해야한다.


    그럼, 가장 먼저 Activity 에 대해서 알아보자.

    Activity

    액티비티는 이미 헬로월드를 테스트할때 확인을 했었다. 기억이 그새 나지 않는다면, '직접 헬로월드 만들기'를 참조하기 바란다. 그럼 액티비티는 뭘까? 액티비티는 쉽게 다음과 같이 정의할 수 있다.

    액티비티 = 한 화면

    각각의 화면을 구성하기 위해서는 각각의 액티비티 클래스가 있어야 한다. 그러므로, 모든 안드로이드 프로그램에는 반드시 액티비티가 있어야 겠지요?

    그래서 하나의 추가적인 화면이 열리면, 그 화면을 호출한 화면은 일시 정지 상태로 변하게 되고, 이전 화면은 history stack에 쌓이게 된다.


    Intent 와 Intent Filter

    안드로이드에서는 스크린이 이동할때 Intent라는 특별한 클래스가 호출된다. Intent 데이터 구조에는 action과 data라는 중요한 내용이 있다.

    action에서 사용되는 일반적인 값은 MAIN, VIEW, PICK, EDIT 등이다. data는 일반적으로 URI로 표현된다.

    IntentFilter 라는 클래스는 Intent가 뭔가를 호출할 때, IntentFilter는 어떤 액티비티와 인텐트 리시버인지에 대한 설명이라고 볼 수 있다.

    그래서 액티비티에서 사용하는 IntentFilter는 AndroidManifest.xml파일에 지정한다.


    그러므로 화면 사이의 이동은 intent를 지정해서 할 수 있다. 지정하는 방법은 startActivity(myIntent) 메소드를 호출하면 된다. 그런 다음 시스템에서는 모든 설치된 어플리케이션에 대한 인텐트 필터를 확인해서 myIntent와 가장 잘 맞는 찾아 낸 후 관련된 액티비티가 수행된다.

    이러한 프로세스를 거치면 장점은 다음과 같다.

    • 액티비티를 재사용 할 수 있고
    • 액티비티는 언제라도 동일한 IntentFilter로 새로운 액티비티로 바뀔 수 있다.

    Intent Receiver

    이 블록은 외부의 이벤트를 처리하기 위해서 사용된다. 뭐 전화가 오거나, 넷웍이 사용가능해 지거나 그럴때...

    인텐트 리시버는 UI 를 나타내지는 않고, NotificationManager라는 것을 사용한다. 인텐트 리시버도 AndroidManifest.xml파일에 지정해서 사용할 수 있지만, Context.registerReceiver() 메소드를 사용해서 등록할 수도 있다.


    Service

    서비스는 UI 없이 수행되는 코드이다. 쉽게 이야기 하면 메일 수신 알림기나 안티바이러스, MP3 플레이어와 같이 백그라운드로 수행되는 작업을 처리하기 위해서 사용된다. 서비스를 사용하기 위해서는 Context.startService() 메소드를 수행하면 된다. 이 메소드가 수행되면, 시스템에서는 해당 작업이 끝날 때까지 작업을 멈추지 않는다.

    그리고 기존에 수행되고 있거나 수행되지 않는 어플리케이션에 연결하는 경우에는 Context.bindService() 메소드를 호출하면 되고, 서비스에서 제공되는 인터페이스를 통해서 서로 커뮤니케이션도 가능하다.


    참고 : 이 내용은 http://code.google.com/android/index.html 의 내용을 참조하여 작성되었음.

  • Posted by tuning-java
    ,

    HelloAndroid 프로젝트를 이클립스에서 생성했을 떄.

    자동으로 만들어지는 파일중에 HelloAndroid.java 파일 말고 또 하나가 있다.

    그 파일이 바로 R.java 파일이다.

    /* AUTO-GENERATED FILE.  DO NOT MODIFY.
    *
    * This class was automatically generated by the
    * aapt tool from the resource data it found.  It
    * should not be modified by hand.
    */

    package com.min.hello;

    public final class R {
        public static final class attr {
        }
        public static final class drawable {
            public static final int icon=0x7f020000;
        }
        public static final class layout {
            public static final int main=0x7f030000;
        }
        public static final class string {
            public static final int app_name=0x7f040000;
        }
    }

    소스를 보니 가장 눈에 띄는 것은 DO NOT MODIFY 이다.

    손대지 말라고?

    왜그럴까?

    한번 이클립스에서 이 파일을 수정해보자.


    아무리 수정하려고 해도 글자가 입력되지 않을 것이다. 왜냐하면 자동으로 generate 되는 파일이기 때문에...


    이 파일에는 여러개의 내부 클래스(inner class)들이 존재한다. 각 클래스들이 뭔지는 모르겠지만, 두번째와 세번째 클래스는 프로젝트의 res 디렉토리 밑에 있는 drawable 과 layout이라는 디렉토리 명과 동일하다. 그리고, 그 안에 있는 파일의 이름과 동이란 것을 확인할 수 있다.


    즉, 이 자바 파일에서는 우리의 이클립스 프로젝트의 res 디렉토리에 선언되어 있는 파일들을 접근할 수 있도록 레퍼런스를 제공한다고 생각하면 된다. 다시 말해서, 아이콘 파일을 사용하기 위해서는 R.drawable.icon 으로 사용하면 되고, main.xml 파일에 정의된 레이아웃을 가져오기 위해서는 R.layout.main 으로 접근하면 된다는 의미가 된다.


    마지막으로 그럼, 레이아웃을 추가하면 어떻게 되는지 보자.

    res/layout/test.xml 파일을 만들어보자.

    그 파일을 만들고, main.xml에 있는 내용들을 복사해서 붙여놓아 보자.

    그러면,  R.java 파일은 다음과 같이 자동으로 수정된다.

    /* AUTO-GENERATED FILE.  DO NOT MODIFY.
    *
    * This class was automatically generated by the
    * aapt tool from the resource data it found.  It
    * should not be modified by hand.
    */

    package com.min.hello;

    public final class R {
        public static final class attr {
        }
        public static final class drawable {
            public static final int icon=0x7f020000;
        }
        public static final class layout {
            public static final int main=0x7f030000;
            public static final int test=0x7f030001;
        }
        public static final class string {
            public static final int app_name=0x7f040000;
        }
    }


    참고 : 이 내용은 http://code.google.com/android/index.html 의 내용을 참조하여 작성되었음.

    Posted by tuning-java
    ,

    일반적인 자바 개발시 예외처리하는 것은 그리 간단하지 않다.


    HelloAndroid를 통해서 어떻게 예외처리가 되는지 간단하게 알아보자.

    package com.min.hello;

    import android.app.Activity;
    import android.os.Bundle;
    import android.widget.TextView;

    public class HelloAndroid extends Activity {
        /** Called when the activity is first created. */
        @Override
        public void onCreate(Bundle icicle) {
            super.onCreate(icicle);
            int i=0;
            int j=3/i;
            TextView tv = new TextView(this);
            tv.setText("\n\n\n\n\n한글이 될랑가? ");
            setContentView(tv);

        }
    }

    이 소스의 중간에 i 값을 0으로 지정하고, j 값에 3을 i로 나누도록 해보자.

    당연히 0으로 나누기 때문에 ArithmeticException이 발생하게 될 것이다.


    그럼 수행해서 결과를 확인해 보자.

    음~~ 당연히 오류가 나는데, 예쁜 예외 메시지 창에 결과가 나타난다.

    앞으로 개발하면서 이런 화면은 나오면 안되겠지만...


    물론 try-catch 구문으로 묶어주게 되면 아무런 메시지도 나오지 않게 된다.

    Posted by tuning-java
    ,

    이제 직접 안드로이드 애플리케이션을 만들어 보자.


    이클립스에서 create Project를 누르고 안드로이드 프로젝트를 누른다음,

    다음과 같이 설정한다.

    Project name : HelloAndroid - 일반 eclipse 프로젝트와 동일한 프로젝트 이름

    Package name :  com.min.hello - 자바에서 사용하는 패키지와 같은 의미의 패키지 이름.
    모든 어플리케이션이 이 폴더밑에 있어야 하며, 모든 시스템에 설치된 패키지의 이름과 절대 같으면 안된다.(유일해야만 한다.)

    Activity name : HelloAndroid - 자동으로 껍데기 (보통 스텁이라고 부르는) 클래스 파일의 이름을 지정한다.
    이 클래스는 안드로이드 activity class의 자식 클래스여야만 한다.

    Application name : My first Android - 보통 사람들이 읽기 쉬운 어플리케이션 이름을 여기에 지정한다.


    이제 Finish를 누르면 자동으로 프로젝트가 생성된다.

    생성된 프로젝트는 다음과 같은 구조를 가진다.

    많이도 생성된다. - -;


    가장 먼저 봐야 하는건 HelloAndroid.java이다. 해당 파일을 열어보자.

    package com.min.hello;

    import android.app.Activity;
    import android.os.Bundle;

    public class HelloAndroid extends Activity {
        /** Called when the activity is first created. */
        @Override
        public void onCreate(Bundle icicle) {
            super.onCreate(icicle);
            setContentView(R.layout.main);
        }
    }

    아까 이야기한대로 Activity 클래스의 상속을 받았다.

    그리고 onCreate메소드를 오버라이드 했다.


    이 상태에서 안드로이드를 실행해 보자.

    (실행 방법은 앞에 설명했으므로, 생략한다. 참고로 안드로이드 에뮬레이터가 실행 상태라면 그냥 다시 이클립스에서 실행하면 된다.

    에뮬레이터를 다시 실행할 필요는 없다.)


    실행하면 "Hello World, HelloAndroid"라는 메시지가 나타난다.

    오~ 신기하다...


    아무것도 한게 없는데...


    저 메시지는 어디에서 지정하는 것일까?


    안드로이드는 두가지 방법의 화면 레이아웃 구조를 갖고 있다.

    한가지는 자바 코드에서 구성하는 방법과 다른 한 가지는 XML파일에서 구성하는 방법이다.

    HelloAndroid 이클립스 프로젝트의 res 폴더 -> layout 폴더 -> main.xml파일을 열어보면 다음과 같이 되어 있는 것을 확인할 수 있다.

    <?xml version="1.0" encoding="utf-8"?>
    <LinearLayout xmlns:android="http://schemas.android.com/apk/res/android"
        android:orientation="vertical"
        android:layout_width="fill_parent"
        android:layout_height="fill_parent"
        >
    <TextView 
        android:layout_width="fill_parent"
        android:layout_height="wrap_content"
        android:text="Hello World, HelloAndroid"
        />
    </LinearLayout>

    뭐가 뭔진 아직 잘 모르겠지만, 중간에 TextView라고 되어 있는 부분이 있다. 가로와 세로 크기를 지정하고 text를 지정했다.

    이 text 부분에 Hello World, HelloAndroid가 바로 에뮬레이터에서 나타난 그 메시지이다.


    그럼 이번에는 저 방식이 아닌 자바 소스에서 지정하는 방법을 알아보자.

    package com.min.hello;

    import android.app.Activity;
    import android.os.Bundle;
    import android.widget.TextView;

    public class HelloAndroid extends Activity {
        /** Called when the activity is first created. */
        @Override
        public void onCreate(Bundle icicle) {
            super.onCreate(icicle);
            TextView tv = new TextView(this);
            tv.setText("\n\n\n\n한글이 될랑가? ");
            setContentView(tv);
        }

    }

    이렇게 하고 다시 한번 실행해보자.

    줄바꿈 처리를 하기 위해서 \n을 사용했다.

    이렇게 해보니 간단하게 한글도 처리되는 안드로이드 어플리케이션이 만들어 졌다.


    여기에 있는 setContentView() 메소드에 대해서 잠깐 알아보자.

    이 메소드는 Activity 클래스에서 반드시 실행되어야 한다. 만약 이 메소드가 실행되지 않으면, 아무런 데이터도 화면에 뿌려지지 않는다.


    참고 : 이 내용은 http://code.google.com/android/index.html 의 내용을 참조하여 작성되었음.

    Posted by tuning-java
    ,

    참고로 이 설명은 [Blog2Book 자바 성능을 결정짓는 코딩 습관과 튜닝 이야기] 책을 읽는 독자분들이 부록으로 제공되는 DevPartner for Java를 보다 쉽게 사용할 수 있도록 작성되었으며, 설치시 14일간 기능의 제한이 없는 임시 라이센스가 생성됩니다.


    DevPartner의 화면에 대한 간단한 설명을 해 보고자 한다.
    먼저 Welcome 화면이다.

    그냥 별 내용은 없는데, 오른쪽에 Java Platform Performance 라는 링크를 누르면 자바의 성능에 대한 관련 책이 링크로 제공된다.

    (인터넷이 되는 곳에서만 확인할 수 있다.
    다음은 Application Testing 화면이다.

    이 화면에서는 WAS 기반의 시스템이 아닌 단독 자바 애플리케이션을 테스트 할 때 사용된다.

    이 화면을 사용하기 위해서는 DevPartner의 프로그램 그룹에 있는 Utility의 Administration 이라는 프로그램을 사용해야만 하는데, 나는 설정하기 귀찮아서 이 기능을 사용하지 않는다.

    이번 화면은 Application Server Testing 화면이다.

    관련 내용은 Application Testing 과 비슷하기 때문에 생략 하겠다.

    이제부터 중요한 화면이다.

    위의 화면은 Session Files 라는 화면인데, drop down 메뉴에 기본적으로 Default라고 나타날 것이다.
    만약 여러분이 config를 다른 이름으로 지정한다면 그 이름도 여기에 나타날 것이다.
    config 지정하는 것은 "WAS 모니터링 시작하기"편을 통해서 확인해 보기 바란다.

    다음은 현재 프로파일링 중인 어플리케이션 세션의 목록을 보는 화면이다.

    여기의 목록에서 프로파일링 중인 대상을 더블 클릭하면, 데이터를 수집할 수 있는 화면으로 이동한다.

    마지막 화면은 설정하는 화면인데, 가장 중요한 화면중 하나이다.

    이 내용은 영어를 읽으면서 하나 하나 설정해 보면 되는데, 만약 자세한 설명이 필요하다는 분들이 많다면,

    자세한 설명을 나중에 추가하도록 하겠다.

    Posted by tuning-java
    ,

    참고로 이 설명은 [Blog2Book 자바 성능을 결정짓는 코딩 습관과 튜닝 이야기] 책을 읽는 독자분들이 부록으로 제공되는 DevPartner for Java를 보다 쉽게 사용할 수 있도록 작성되었으며, 설치시 14일간 기능의 제한이 없는 임시 라이센스가 생성됩니다.


    DevPartner for Java (이하 DevPartner)를 윈도우즈 기반에서 설치하는 방법은 매우 간단하다.


    DevPartner를 설치하기 위해서는 설치 디렉토리에 있는 Setup.exe 파일을 실행하면 다음과 같은 화면이 나타나고, 여기서 install Compuware DevPartner를 선택하면 된다.

    기본적인 설치 방법은 여타 다른 툴들과 비슷하기 때문에 생략하고, 중간에 Integrate DevPartner Java Edition with your IDE 와 다른 옵션을 선택하는 부분이 있다. 다른 옵션은 선택하지 않는 것이 좋고, 만약에 eclipse와 같은 툴에서 사용하기 위해서는 Integrate... IDE를 체크하여 eclipse의 경로를 지정하면 된다.


    모든 설치가 완료되면 "반드시" PC를 재기동 해야한다. 윈도우용 설치파일만 제공되기 때문에 Linux나 Unix에서 설치하는 방법에 대해서는 여기서 다루지 않겠다.


    PC를 재기동 한 이후에 자동으로 DevPartner 초기화면이 기동될 것이다.


    다음부터 이 초기화면으로 이동하기 위해서는 윈도우의 시작 -> 프로그램 -> Compuware DevPartner Java Edition -> DevPartner Java Edition을 선택하면 이 화면으로 이동할 수 있다.


    이 화면이 정상적으로 나타난다면 제대로 설치가 된 것이다.

    나는 그렇지 않은 경우가 없어서 그렇지 않은 경우에 어떻게 하냐고 물어보셔도 모르니 참조해 주기 바란다.

    (기본적으로 자바가 설치 되어 있어야 하며, 현재 제공되는 프로그램의 경우에는 JDK 6.0이 지원되지 않는 것으로 알고 있다. 사용하려면 JDK 5.0을 설치하여 사용하기 바란다.)


    첫 화면이 나타나면 눈치를 챈 분들도 있겠지만, 내부적으로 톰캣 서버를 기동하여 그 톰캣 서버에서 작업을 수행하는 구조로 되어 있다.


    설치 단계의 마지막으로 한가지 팁을 알려드리면, 이 툴의 경우 관련된 서비스가 항상 실행되도록 되어 있기 때문에 해당 서비스를 자동이 아닌 수동으로 수행될 수 있도록 변경해 주어야만 한다.

    윈도우 시작 -> 설정 -> 제어판 -> 관리도구 -> 서비스를 선택하면 아래와 같은 화면이 나타날 것이고, 여기서 잘 찾아보면 Compuware 어쩌구 저쩌구하는 것이 있는 것을 확인할 수 있다.


    해당 줄을 더블클릭하면 다음과 같은 화면이 나타난다.

    여기서 중간에 있는 자동을 수동으로 변경하고 확인을 누르면 이제부터 시작할때 마다 DevPartner가 시작되지 않는다.

    Posted by tuning-java
    ,

    맨날 무슨 언어든 배우기 시작하면 헬로월드부터 찍는다.

    나도 당근 이것부터 시작해 볼 작정이다. 일단 제공된 샘플을 돌려보는걸 해보자.


    가장 먼저 이클립스에서 New Project... 을 선택한다.

    그러면 Android가 추가되어 있는데, 추가된 안드로이드 프로젝트를 선택하자.


    다음화면에서 아래 그림과 같이 Create project from existing source를 선택하고, Browse를 해서 HelloActivity를 선택한다.


    Finish를 누르면 새로운 프로젝트가 추가될 것이다.


    이제 프로젝트 import 작업은 끝났고, 해당 이클립스 프로젝트의 root를 선택한후 오른쪽 마우스를 눌러서

    Run As... 후 Android Application을 누르면 안드로이드 에뮬레이터가 뜨게되고, 아래의 그림과 같이

    Hello World와 에디터가 나타나게 된다.

    참고로... 처음 실행하게 되면 화면이 작동되는데 시간이 좀 걸린다.

    Posted by tuning-java
    ,

    일단 다운로드는 요령껏 받자.

    다운로드 받기 전에 시스템 요구사항을 간단히 알아보자.

    지원 OS는 윈도 XP, 비스타, 맥 OS 10.4.8 이상, 리눅스 만 된다.

    지원되는 개발환경은 이클립스 3.2,3.3에 JDT와 WST 플러그인 포함.

    JDK5와 6 (JRE만 깔았으면 안된단다...)

    추가로 안드로이드 개발 툴즈 플러그인도 있다.

    시스템 요구사항이 정확하게 본인의 PC와 맞는다면 다운로드 받은 파일의 압축을 풀자.

    압축을 풀면, 다음과 같은 폴더와 파일들이 있다.

    /docs
    /samples
    /tools
    이상은 폴더 목록...

    android.jar 및 기타 파일들

    압축을 풀면 그냥 다 되는게 아니고,

    환경 설정을 해야 한다.


    참고로 나는 D:\GoogleAndroid 에 압축을 풀었다.

    윈도우의 시스템 환경을 열어서 "시스템 환경변수"에서 path에 D:\GoogleAndroid\tools 디렉토리를 추가한다.

    (설마 개발자분이 이 설정을 하는 방법을 모를리는 없으니, 자세한 방법은 일단 패쑤)


    이제 이클립스 플러그인을 추가하자.

    이클립스 플러그인을 추가하는 방법은 모르는 분들이 많으실테니,

    상세하게 알려주겠다.


    1. 이클립스를 기동해서 Help -> Software Updates > Find and Install 을 클릭한다.
    2. 화면이 뜨면 아래와 같은 화면에서 아래에 있는 new features 어쩌구가 있는걸 선택하고 다음으로 넘어간다.
    3. 그 다음화면에서 오른쪽 구석탱이에 있는 New Remote Site...을 클릭한다.
    4. 이름은 아무거나 입력하고 URL은 다음의 URL을 입력한다.
      https://dl-ssl.google.com/android/eclipse/
    5. 그 다음에 finish를 누르면 Update manager가 뜨고 선택하는 화면이 나타나는데 그 화면에서 체크 박스를 누르고 Finish 버튼을 누른다.
    6. 그 다음에 Accept하고 install 을 누르면, 이클립스를 껐다가 키라고 하는데, 재시작 버튼을 Yes를 누르면 이클립스가 재기동된다.
    7. 아직도 끝난게 아니다. 이클립스에서 Windows --> Preferences를 눌러서 Android를 눌러보자. 그러면 경로 입력 창이 뜨는데, 거기서 안드로이드 압축이 풀려 있는 D:\GoogleAndroid 를 입력하면 기본적인 모든 설정은 끝난다.

    참고 : 이 내용은 http://code.google.com/android/index.html 의 내용을 참조하여 작성되었음.

    Posted by tuning-java
    ,

    Android(이하 안드로이드)는 모바일 디바이스를 개발하기 위한 구글에서 만든 OS, 미들웨어, 어플리케이션의 집합이다.

    고로 구글폰에서 사용할 수 있는 어플리케이션을 맹글 수 있다.


    안드로이드의 홈페이지는 http://code.google.com/android/index.html 이며, 홈페이지를 통해서 여러가지 정보 및 동영상을 볼 수 있다.


    안드로이드 개발을 위해서는 SDK를 다운로드 받아야 하는데, 초기 화면의 우측 상단 구석에 "Download Android"를 클릭해서 자신의 개발 환경에 맞는 도구를 선택하면 된다.

    일반적으로 Windows에서 사용을 하므로, 앞으로의 설명도 모두 Windows 기반하에서 개발하는 방법에 대해서 정리하겠다.

    안드로이드는 자바 언어를 사용하는데 Sun의 JDK가 아닌 Dalvik 이라는 가상 머신상에서 돌아가도록 되어 있다. 그래서 .dex 라는 파일을 통해서 실행하게 된다.


    안드로이드의 주요 특징은

    • 어플리케이션 프레임웍이며
    • Dalvik VM을 사용하고
    • Webkit 이라는 엔진에 기반을 둔 통합 브라우져를 사용한다.
    • 그리고 OpenGL ES 1.0스펙을 따르는 2D, 3D 를 지원하고
    • SQLite라는 데이터 저장소를 사용하며,
    • MPEG4, MP3, JPG,GIF등의 미디어 지원을 한다.
    • 하드웨어에 의존적이긴 하지만 GSM 전화 기술과
    • 블루투스, EDGE, 3G, WiFi 기술과
    • 이클립스 상에서 수행할 수 있는 개발 환경을 지원한다. 물론 에뮬레이터와 디버깅 툴, 메모리 및 성능 프로파일링, 이클립스 플러그인도 여기에 포함되어 있다.

    이제 대충 알아봤으면 위에 있는 홈페이지에 연결하여 SDK를 다운로드 하자.


    참고 : 이 내용은 http://code.google.com/android/index.html 의 내용을 참조하여 작성되었음.

    Posted by tuning-java
    ,

    [Fedora] Fedora update 하기

    ETC 2008. 2. 27. 06:43

    Fedora도 OS 이기 때문에, 설치한 이후에나

    어느정도 사용한 이후에 update를 수행해 주어야 한다.

    콘솔을 연 이후에

    yum -y update

    명령어만 치면 알아서 update 한다.

    문제는 internet에 연결되어 있어야 하며,

    update하는데 엄청난 시간이 소요되므로,

    밥먹으러 가거나 퇴근할때 이 명령어를 수행하는것이 좋다. ^^;

    Posted by tuning-java
    ,